The Carrot bed is full but of what?
Many of the grass like seedlings actually might just be grass after all.
I weeded and weeded and now there are a few actual positive sightings of carrot tops but most of it looks like little grasses.
However on pulling one up,there is a distinctive carroty niff so I replanted it and have left well alone.
The strawberries are finished fruiting and I am hard at work weeding the grass,Nettles and creeping buttercup out .
The two beds are crowded but they are beginning to take up some semblance of a strawberry patch as opposed to a miniature jungle.
Many snail and ant eggs are uncovered along with their parents.
I have sown clover in two of the onion beds and phacelia in the other.
These are green manures to improve the soil.
The clover is already up .
Amongst the Strawberries, I found several vetch seed pods and collected a few as they are supposed to be useful also as green manure.
Last week I bought a berry picking tool.
It looks like a Dustpan but the bottom is a comb rather than solid.
To use it ,you have to sort of scoop at the berries which become caught in the comb and drop into the pan.
It is an ingenious contraption, simple and effective.
I remember Ray Mears featuring a similar tool in one of his episodes.
It has sped up the berry harvesting by about 90% as previously I could spend an hour an evening on just harvesting raspberries and red currants.
My poor Berries are very crowded with weeds and will get a proper clear out once they have finished fruiting.
The Cleavers,Rogue Blackberry brambles and Bear Bind are everywhere.
On the harvesting side...
We have had quite a few courgettes and a few French beans and even one or two runners today.
There aren't many peas but they are lovely when we have had any.
Today was spent in weeding the strawbs and in hunting indoors for DS' document folder in which he had put all his qualification details and then mislaid the whole lot.
I found it .
The rain has been persistent.
There is fruit on the tomatoes but I don't know if they will ripen with so little sunshine.
We cheered ourselves up with pork chops and chips for tea.
The chops were courtesy of Lidls who were selling them half price this week.
The green veg was all from the garden which is satisfying.
Showing posts with label tools. Show all posts
Showing posts with label tools. Show all posts
Monday, 16 July 2012
Monday, 11 June 2012
The Tomatoes are unleashed
I spent all Saturday afternoon mowing our lawn,then strimming the edges.
( We call 'weed wackers', 'strimmers' in the UK) .
We bought a much longer electric flex a couple of weeks ago because OH is slowly erecting a fence and the cable we had was much too short for him to use an electric drill. At first we thought we would just see if we could borrow the extension cable from a neighbour but then I realised it would be better to buy one ourselves as then I can use the strimmer and the hedge clippers in the veg plot and beyond as well.
Anyway,the plan worked well because I lopped off a lot of bramble and nettles straight after we bought it and this week,the strimmer helped hugely in tidying up the paths and weedy growth down there.
The whole thing from getting out the mower, to putting away the Strimmer, took about 3 1/2 hours with a short 15 minute intermission while I discovered why the power wasn't getting through towards the end of mowing.
It turned out to be a break in the wire where it fits into the plug ,invisible because it had broken inside the plastic cover of the cable but not too frustrating because having eliminated everything else,it was the only thing left .
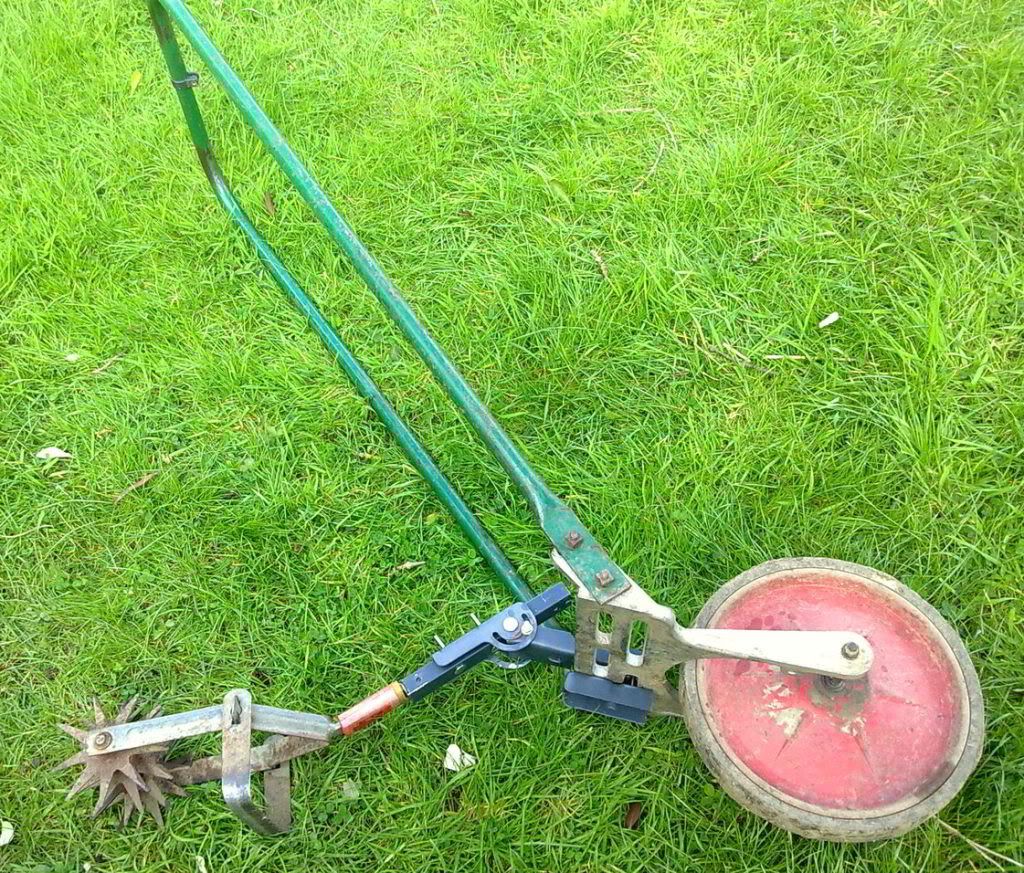
On Sunday, I got out the 2 Wheel hoes again.
First I used the cultivating teeth to loosen up my latest cleared bed, then the little rake (it's actually a bit too small) was fitted on, to clear the roots.
Lastly,I made two furrows with the ridger,one on either side of the bed.
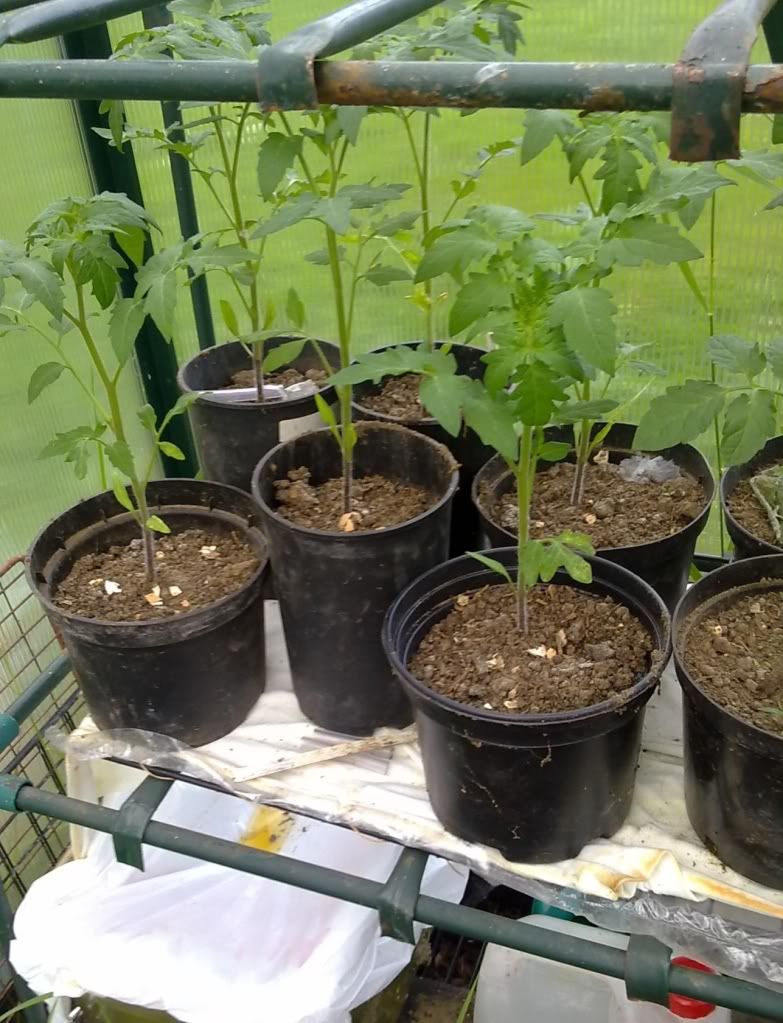
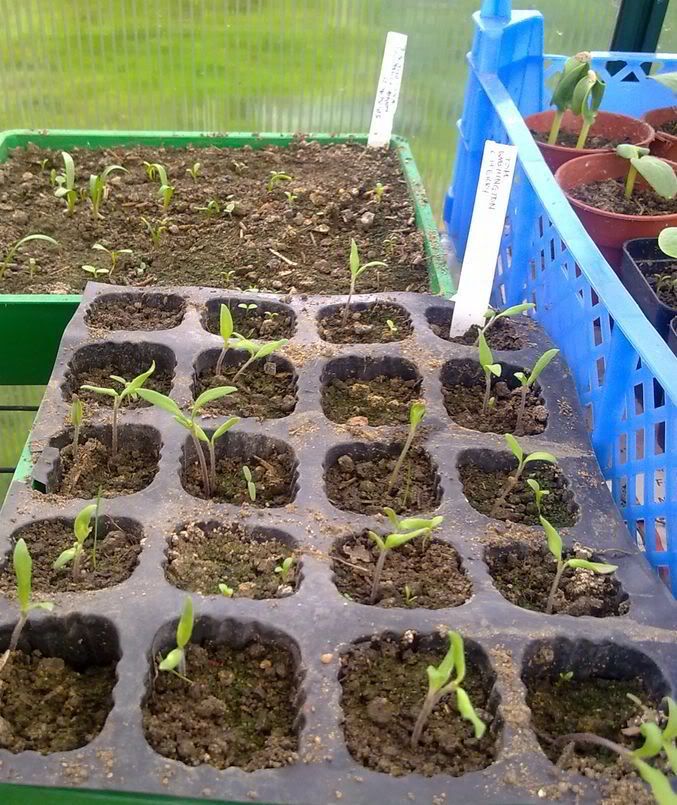
The Tomatoes were then spaced out in the furrows and their pots put alongside them.
A bamboo cane was planted on the other side and I covered each plant using a trowel so I could right the plants individually and make sure the pots didn't get filled with mud.
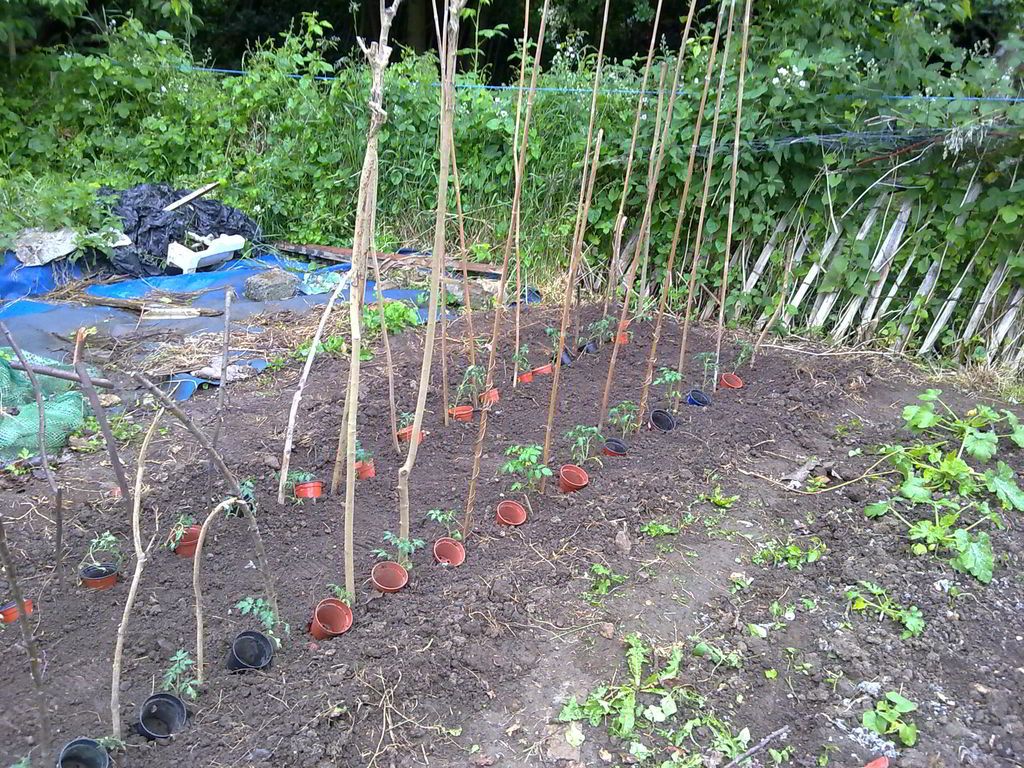
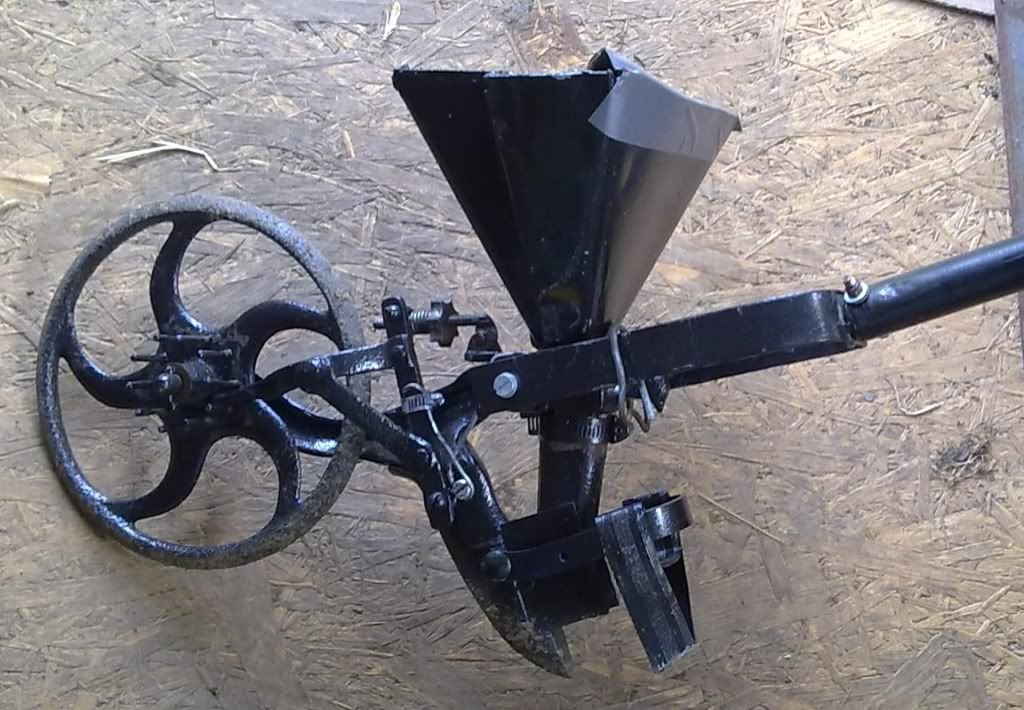
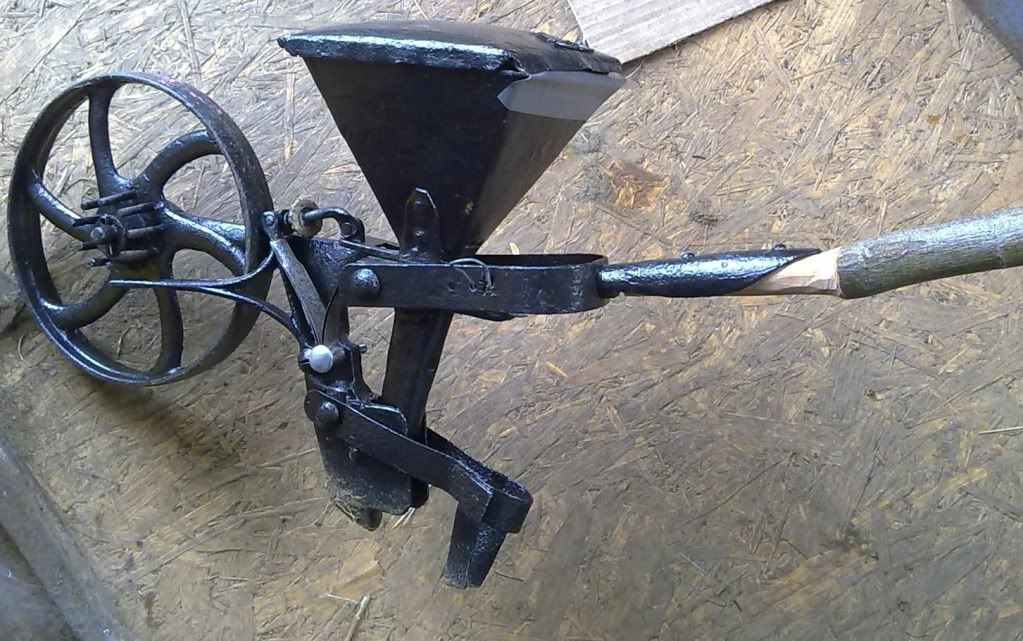
Here it is from the side.
The Wheel has prongs all around the hub.
There is a metal pointer which rests on the prongs and when the wheel rotates, the pointer is forced up and down.
At the other end of the pointer is a bolt with an adjustable knob.
The bolt is connected to the slider plate with the bullet hole in it.
So when the pointer is forced up and down, the plate must push backwards and forwards under the hopper.
A strong spring makes sure the pointer stays against the wheel prongs.
When the plate is in the forward position,the hole is shut because it is no longer under the hopper.
When the plate is back, the hole is open and depending on where you have adjusted the knob, it allows a seed or some seeds to drop through.
There is no adjusting for distance between seeds but as the plate takes longer to expose the complete hole when planting bigger seeds, the distance is further apart.
My French beans were around 4" apart when they emerged. There were a few skipped places but the cats had been in and scratched up a lot of the bed during the night and I had to keep pushing seeds back in for a few days.
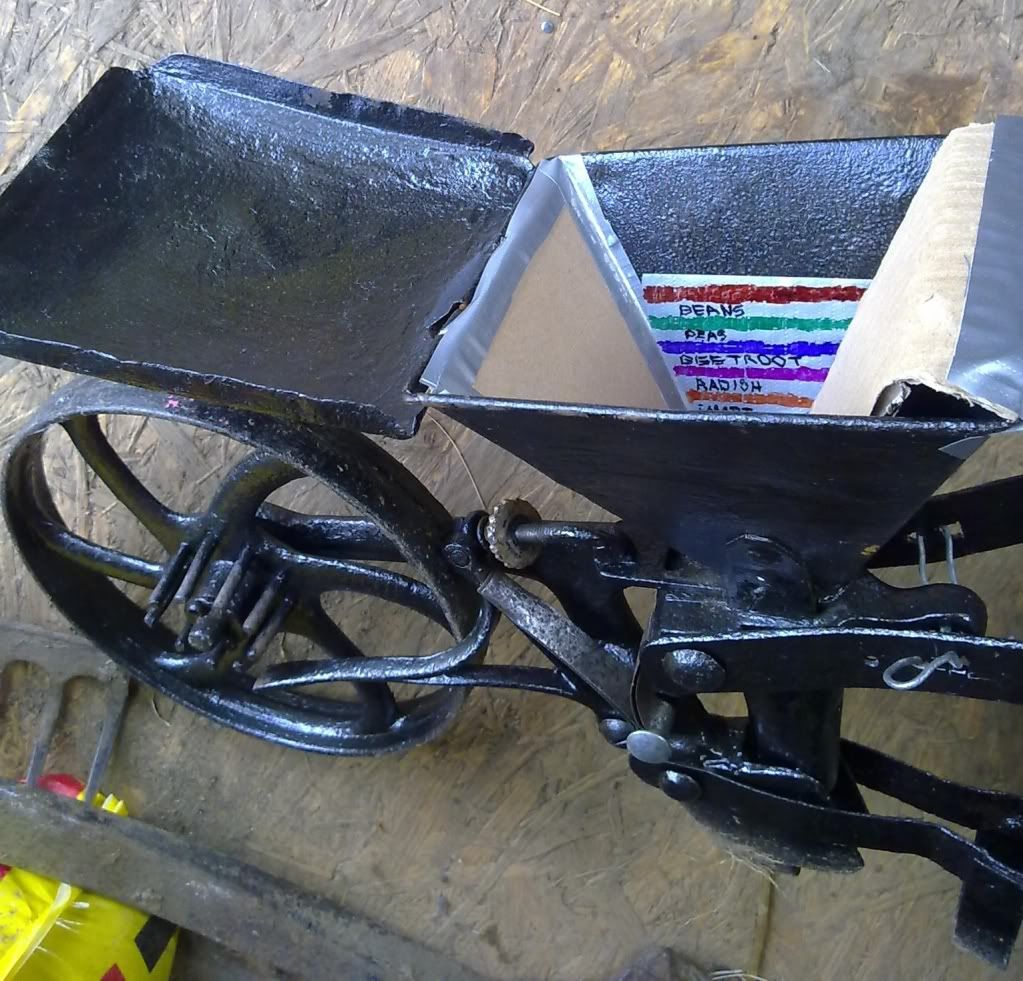
Originally I didn't have the cardboard in it but the seeds got left at the back of the hopper too often so the cardboard is sitting on the little prong which is on the slider plate behind the hole (I assume to stop the plate from shooting out too far).
The cardboard shoots forward as the sliding plate moves and that helps to bounce the seeds to the front.
It needs a lid else the seeds sometimes leap out of the top due to the springy action.so I cover it with a plastic bag and hold it on with elastic. This works very well as you can see when it is empty and if you lay the seeder down,the seeds don't all tumble out.
The seeder in the picture is probably the older of the two as it has' Le Butt of Bury St Eds' on the side.
The maker is Josiah Le Butt who invented it in 1869.
I made the hopper on this one as the original had broken off and was gone.
 The other one is not branded at all and the wheel rim is flatter. The original lid and hopper are still strong.
I have a metal shelf fitting for a stand for the two seeders and the Jalo wheel hoes.
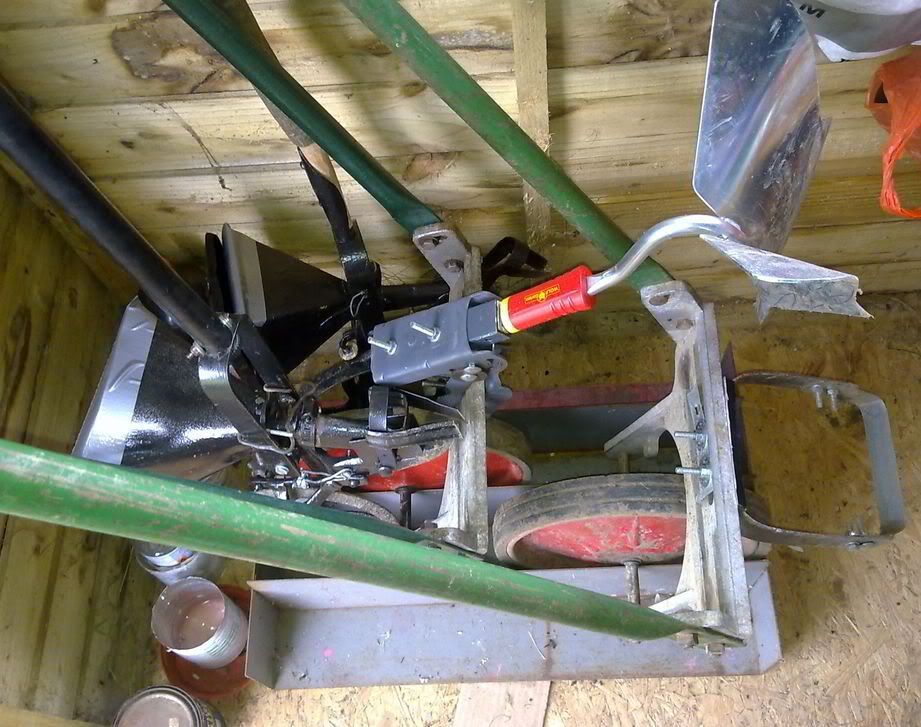 It means they can all stand in the corner of the shed near the door and not take up too much room.
In the picture, the stirrup hoe is still bolted to the older Jalo and the Ridger is fitted onto the bracket I made on the other one.
The Hoe with the ridger is now painted and de rusted and looks much better than it did when I got it.
What I originally thought was a thicker handle ,was in fact just layers of thick blobby paint .
The two hoes are almost identical now it is painted.
The only difference I can see, is the wheel on the one,has a star pattern (you can just see it in the photo ).
The other is smooth.
( We call 'weed wackers', 'strimmers' in the UK) .
We bought a much longer electric flex a couple of weeks ago because OH is slowly erecting a fence and the cable we had was much too short for him to use an electric drill. At first we thought we would just see if we could borrow the extension cable from a neighbour but then I realised it would be better to buy one ourselves as then I can use the strimmer and the hedge clippers in the veg plot and beyond as well.
Anyway,the plan worked well because I lopped off a lot of bramble and nettles straight after we bought it and this week,the strimmer helped hugely in tidying up the paths and weedy growth down there.
The whole thing from getting out the mower, to putting away the Strimmer, took about 3 1/2 hours with a short 15 minute intermission while I discovered why the power wasn't getting through towards the end of mowing.
It turned out to be a break in the wire where it fits into the plug ,invisible because it had broken inside the plastic cover of the cable but not too frustrating because having eliminated everything else,it was the only thing left .
On Sunday, I got out the 2 Wheel hoes again.
First I used the cultivating teeth to loosen up my latest cleared bed, then the little rake (it's actually a bit too small) was fitted on, to clear the roots.
Lastly,I made two furrows with the ridger,one on either side of the bed.
The Tomatoes were then spaced out in the furrows and their pots put alongside them.
A bamboo cane was planted on the other side and I covered each plant using a trowel so I could right the plants individually and make sure the pots didn't get filled with mud.
I ran out of canes but there were plenty of branches lying around under the trees from our hedging escapades so that was no problem.
It rained quite hard for most of the rest of the day so they got a good watering in. Eventually they will be watered through the pots,hence their being planted beside one each.
The idea is that the roots are the part of the plant that needs the water and if you water straight into the pot, it gets there, rather than evaporating . We have used this method before to good effect.
I haven't grown tomatoes for a couple of years.
One year we had blight which usually affects a whole area as it is air born.
Last year I didn't grow anything at all because of working from home becoming all encompassing.
Next I used the stirrup hoe on the other wheel hoe to weed everywhere it would fit.
I can sort of weed the onion beds with it but when I planted them out last Autumn, I forgot to measure how wide the Jalo was and so there are a few bits where only a hand hoe will fit.
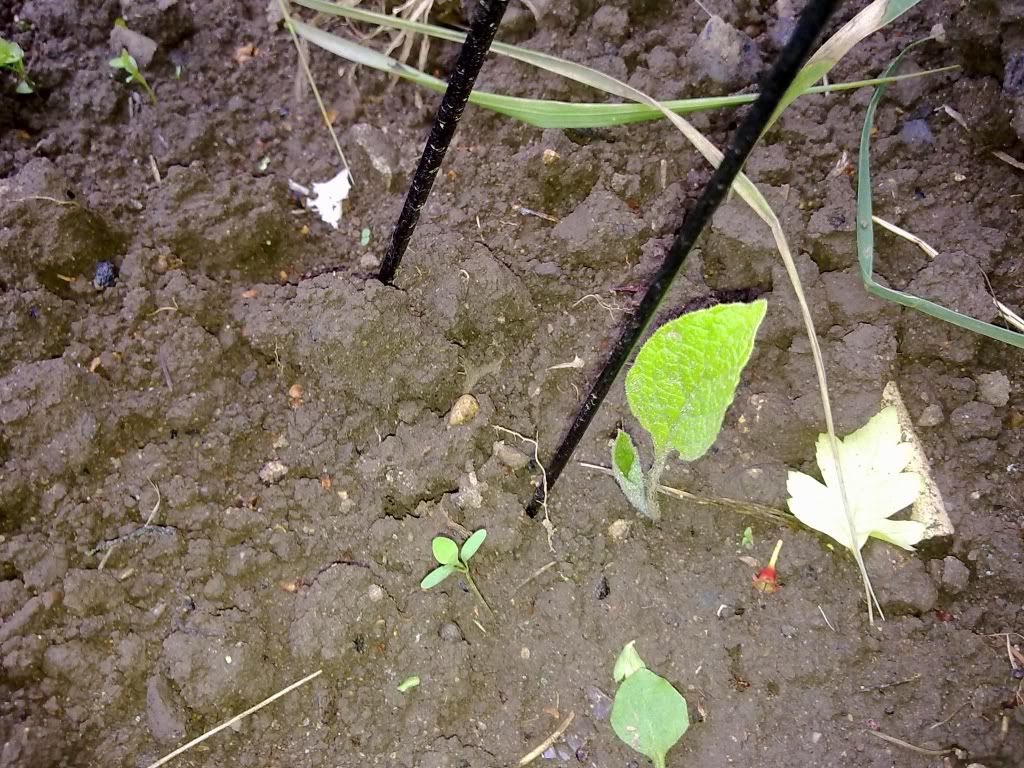
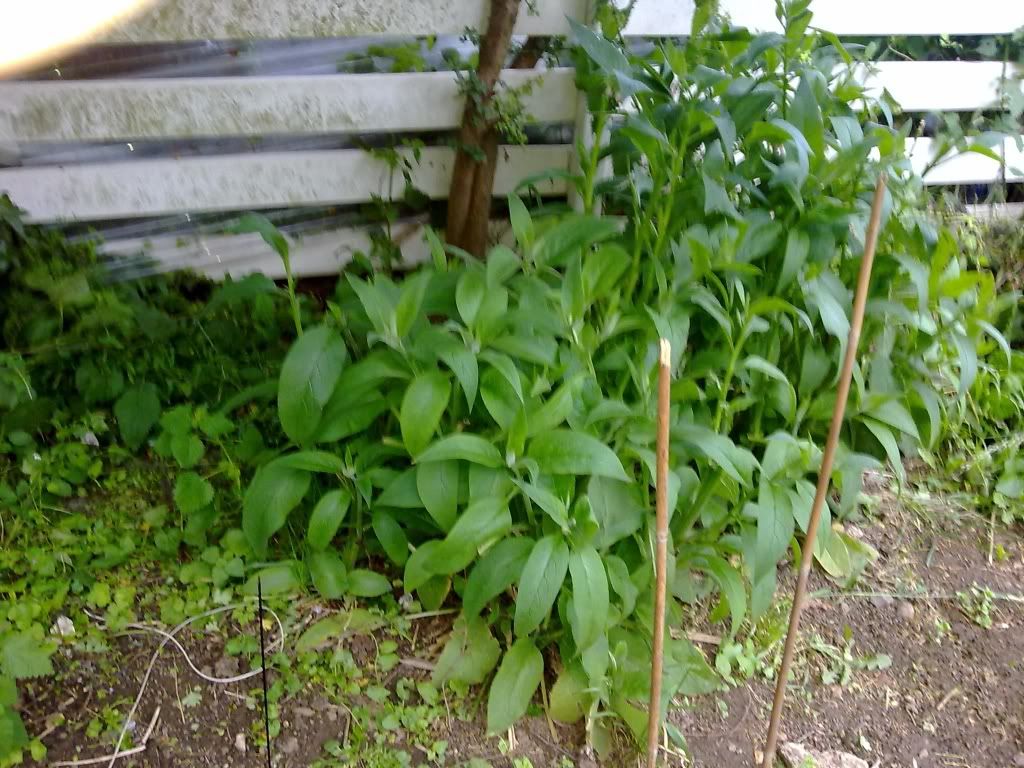
The Comfrey is beginning to show at last!
It is that little bright green leaf beside the umbrella-stay which I put there to mark where each piece of cutting was planted and hopefully keep OH's giant cloddies off it ,not to mention the cats.
There are 12 pieces in there and so far 6 are peeping out.
In the Autumn,I will make cuttings myself from the older clump that was planted about 5 years ago.
I wanted that clump to be well established before dividing it because despite having bought it from the HDRA and receiving 10 cuttings, only 3 or 4 came up.
Eventually I hope to line the edge of the plot using cuttings as it is so useful and because we have the Russian Comfrey variety, it is non invasive.
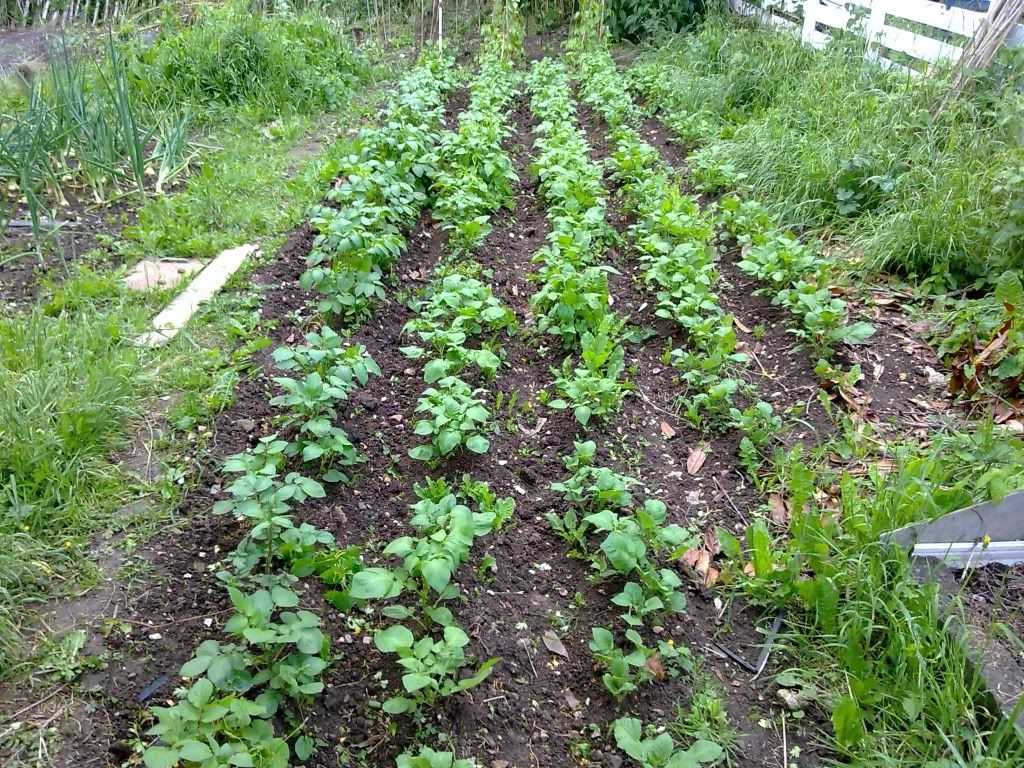
After the weeding,I whooshed the Jalo up and down between the spuds and then with the ridger still on the other Jalo (hence the usefulness of having two).
I swooped between the rows again and tidied them up.
That may well be the last earthing up they need this year because the canopy of leaves will soon meet overhead and once it does,the weeds are not such a problem.
Here they are from about 2 weeks ago. They leaves are much more prolific now.
The weeds on the right are strimmed off now too and the left hand path is strimmed.
More about the Victorian seeders and the Jalo Gardener Hoes
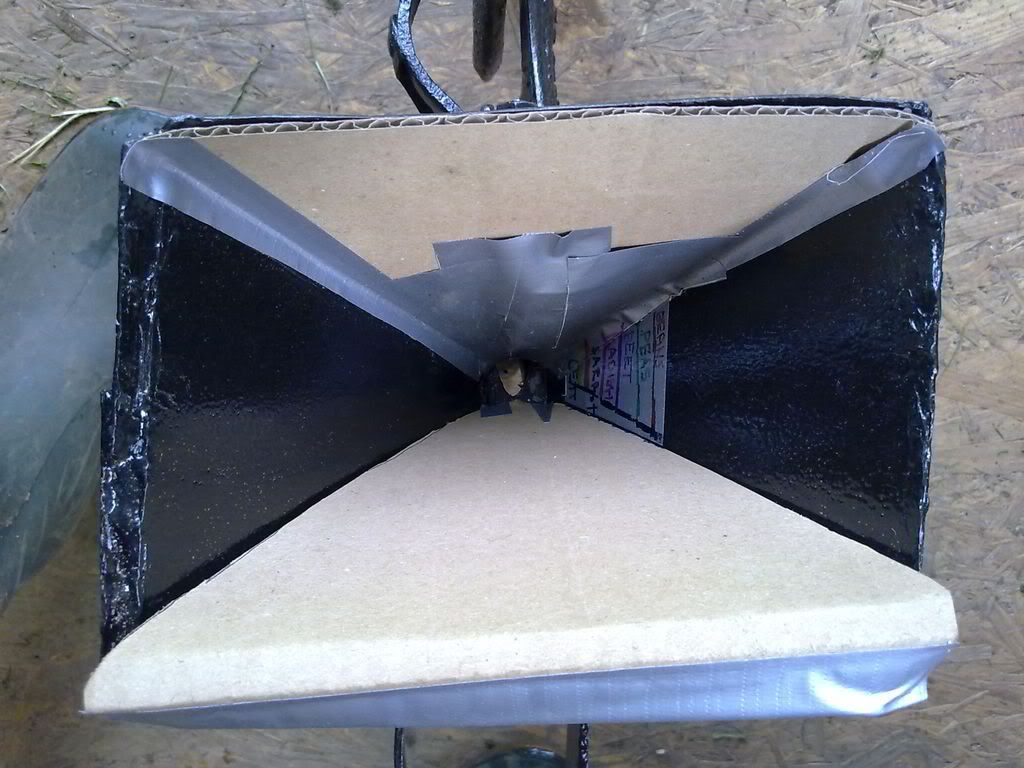
I managed to get a picture of the inside of the victorian seeder at last!
This is looking down with the front of the hopper at the top of the pic.
The hopper is bottomless and there is a sliding plate below,on which it sits fairly snuggly.
It isn't really easy to see but there is a bullet shaped hole on the sliding plate .
This is set to almost fully open in the picture and the white shape at the bottom is the floor of the shed seen through the bullet shaped hole and the seed chute beneath.
Here it is from the side.
The Wheel has prongs all around the hub.
There is a metal pointer which rests on the prongs and when the wheel rotates, the pointer is forced up and down.
At the other end of the pointer is a bolt with an adjustable knob.
The bolt is connected to the slider plate with the bullet hole in it.
So when the pointer is forced up and down, the plate must push backwards and forwards under the hopper.
A strong spring makes sure the pointer stays against the wheel prongs.
When the plate is in the forward position,the hole is shut because it is no longer under the hopper.
When the plate is back, the hole is open and depending on where you have adjusted the knob, it allows a seed or some seeds to drop through.
There is no adjusting for distance between seeds but as the plate takes longer to expose the complete hole when planting bigger seeds, the distance is further apart.
My French beans were around 4" apart when they emerged. There were a few skipped places but the cats had been in and scratched up a lot of the bed during the night and I had to keep pushing seeds back in for a few days.
Originally I didn't have the cardboard in it but the seeds got left at the back of the hopper too often so the cardboard is sitting on the little prong which is on the slider plate behind the hole (I assume to stop the plate from shooting out too far).
The cardboard shoots forward as the sliding plate moves and that helps to bounce the seeds to the front.
It needs a lid else the seeds sometimes leap out of the top due to the springy action.so I cover it with a plastic bag and hold it on with elastic. This works very well as you can see when it is empty and if you lay the seeder down,the seeds don't all tumble out.
The seeder in the picture is probably the older of the two as it has' Le Butt of Bury St Eds' on the side.
The maker is Josiah Le Butt who invented it in 1869.
I made the hopper on this one as the original had broken off and was gone.
I have a metal shelf fitting for a stand for the two seeders and the Jalo wheel hoes.
In the picture, the stirrup hoe is still bolted to the older Jalo and the Ridger is fitted onto the bracket I made on the other one.
The Hoe with the ridger is now painted and de rusted and looks much better than it did when I got it.
What I originally thought was a thicker handle ,was in fact just layers of thick blobby paint .
The two hoes are almost identical now it is painted.
The only difference I can see, is the wheel on the one,has a star pattern (you can just see it in the photo ).
The other is smooth.
Friday, 8 June 2012
Blustery ,wet and weedy
Well I don't know where the time went!
Today is so windy that I haven't done anything in the garden.
I bought an automatic window opener for the greenhouse a couple of weeks ago.
It was getting hot in there very quickly each morning and sometimes I don't think I was down in time in the morning to cool things down by opening the window.
The opener works on the heat of the sun and so opens and closes as needed.
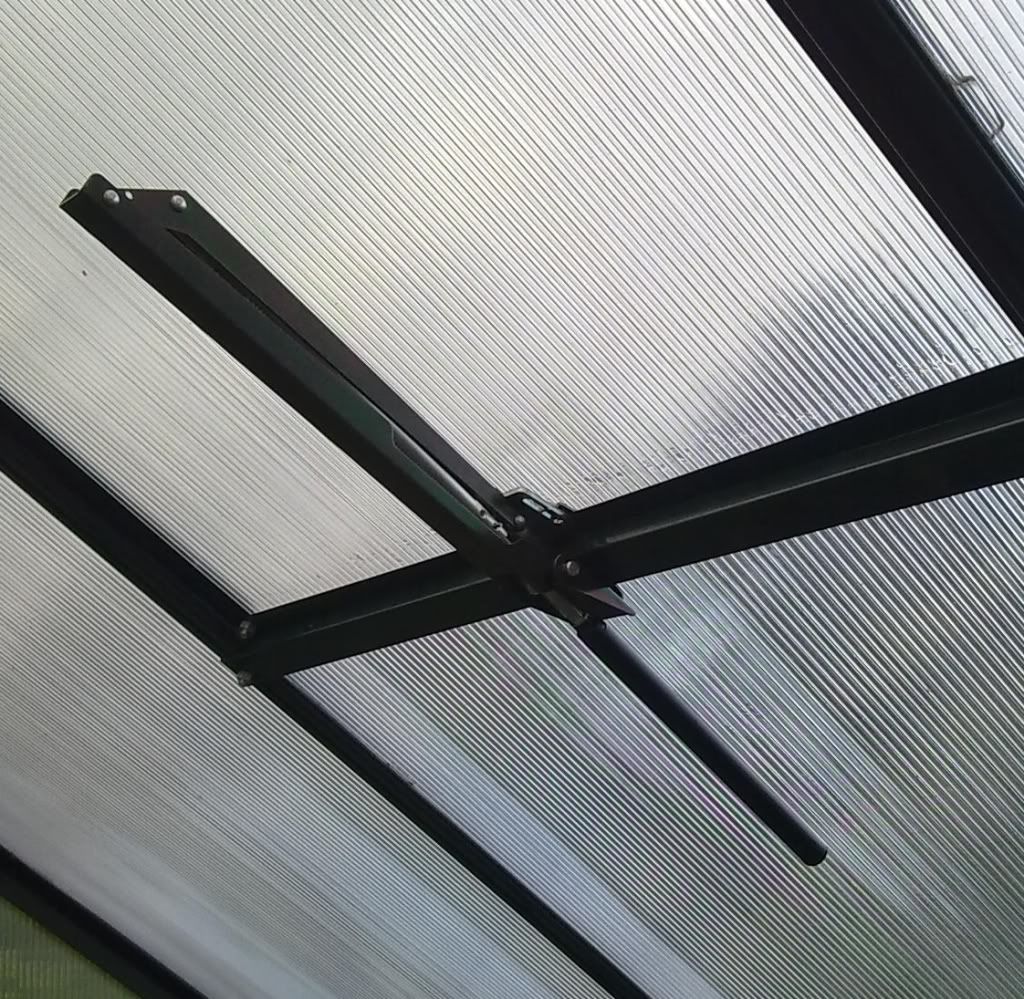 Its closed right up here as it is blowing a gale outside.
I also made a capillary matting watering system.
I used old cotton shirts for the matting.
Some old plastic wrapping underneath it so my staging doesn't get rusty from being damp
and
3 large containers for the water.
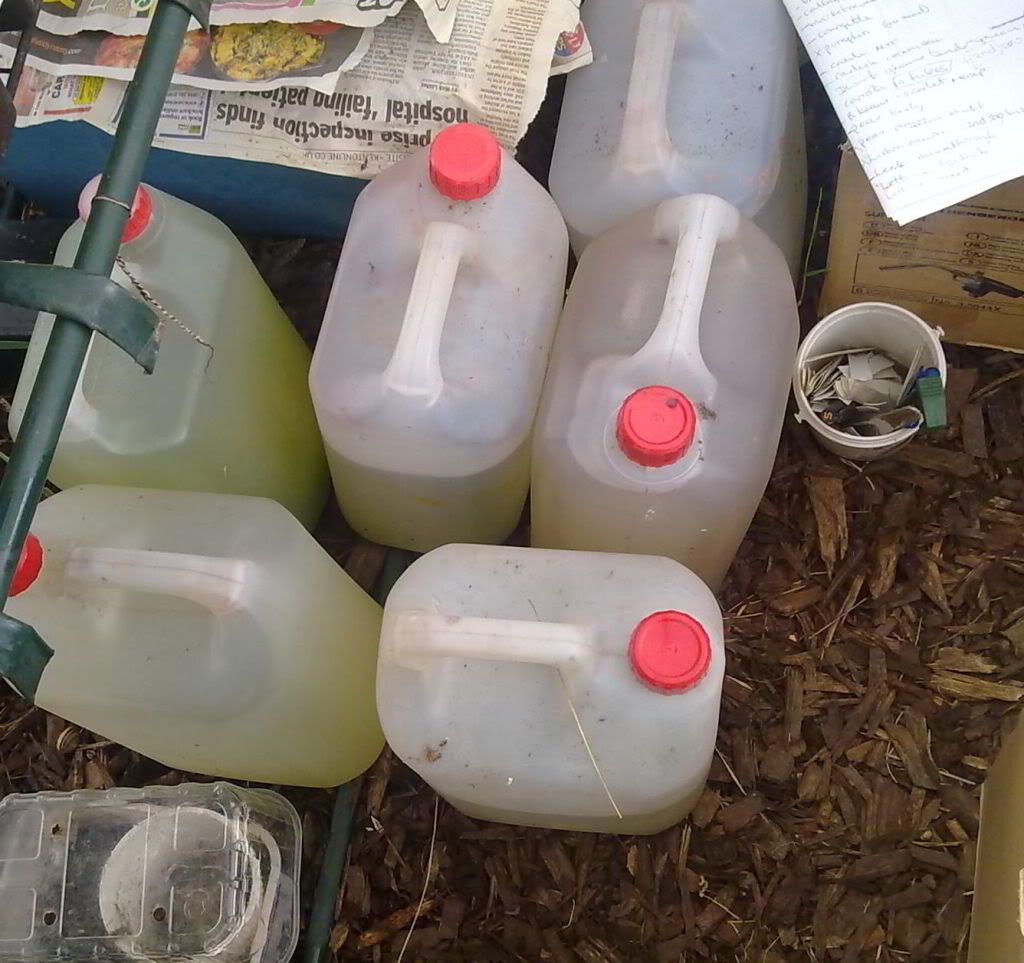
The water butt was almost empty last weekend and then we had a night of battering rain which yielded about 8 gallons in my water catching buckets and presumably filled the big water butt back up.
I decanted the 8 gallons into plastic gallon containers and it rained the following night yielding another 6 cans worth.
The runner beans are planted and one has some red flowers already.
Courgettes are all planted and showing their yellow flowers.
The peas are struggling but not dead.
Spinach is looking well for all the rain.
French beans are looking quite strong, I planted some from the greenhouse and sowed another packet straight into the garden.
The direct sowing was done with the victorian seeder which did quite well where it didnt skip seeds too much.
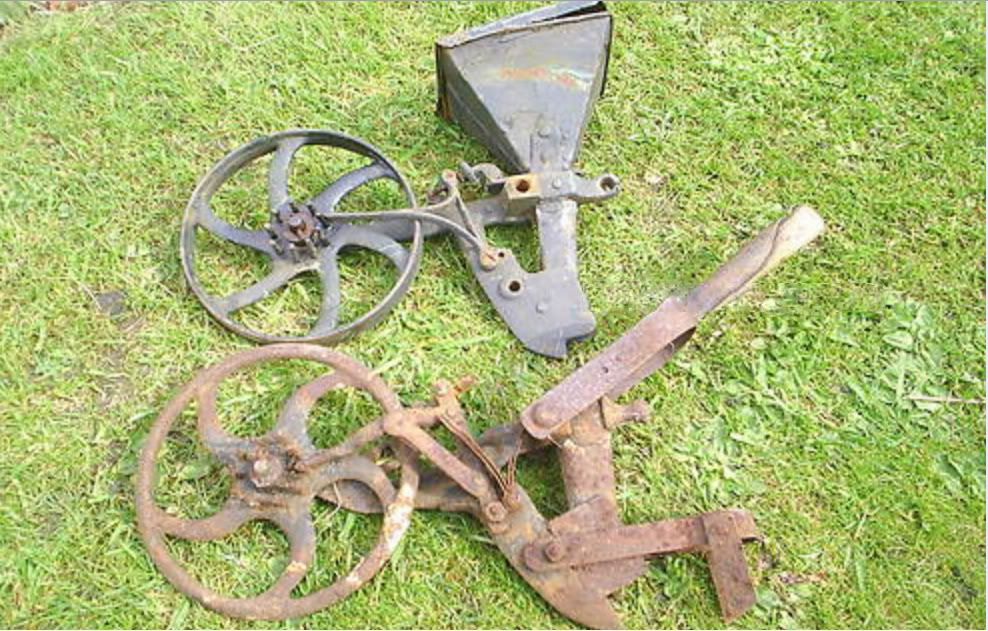 This is the seeders as I received them from the ebay seller.
They were both rusty and the lower in the picture was absolutely seized.
 This is the top seeder now. The gaffer tape is holding some corrugated card in place.
The card helps to keep the seeds towards the front part of the hopper where the chute is.
This one has a new hopper made from an Aluminium Apple mac case,cut to shape with the Dremel and then a lot of folding and gritting of teeth to get it to the right dimensions. I use a plastic bag over it to stop the seeds jumping out. This also has gaffer tape to hold a piece of corrugated card in place.
I made the spring for this one from an old Bicycle caliper brake spring we had lying around.
The row coverer is a bit of old foot pump with a strip of the stuff you join flooring together with at a door.
The handle is from a very old knackered Tripod.
This is slightly better for accuracy of rows than the other more original seeder.
Inside each hopper, I have marked off the seed sizes. There is a gnarled knob to change the seed size and you have to look into the hopper to get the hole the right size.
The graduated chart goes from Beans at the top, to carrots at the bottom.
I will get a picture of the actual seed chute etc tomorrow ,my battery gave out just when I was about to photograph it today.
I have sown some brassicas out direct also as the greenhouse plants nearly all died.
I was left with only 3 brussels sprouts and one broccoli of the earlier pot sowings.
I sowed pak choi and radish using a newer seeder (Danish) which was not bad but did seem to be oddly marked for spacing so I managed to sow about 8" of radish then an 8" gap then another 8" which I then had to thin out substantially once they showed.
I think I will write my own instructions for it once I get used to it more.
The direct sowing of brassicas was done with the less original Victorian seeder
Today is so windy that I haven't done anything in the garden.
I bought an automatic window opener for the greenhouse a couple of weeks ago.
It was getting hot in there very quickly each morning and sometimes I don't think I was down in time in the morning to cool things down by opening the window.
The opener works on the heat of the sun and so opens and closes as needed.
I also made a capillary matting watering system.
I used old cotton shirts for the matting.
Some old plastic wrapping underneath it so my staging doesn't get rusty from being damp
and
3 large containers for the water.
You can just see the water reservoir bottom left. Its an old plastic aquarium that the kids used to have gerbils in.
It is quite useful for a day or two of keeping things moist.
In the very hot weather,the matting was drying out after about 24 hours despite the water containers but in the cooler days, it lasts much longer.
Next month we have a 3 day trip to Scotland to see DD's Graduation so it will be handy then.The water butt was almost empty last weekend and then we had a night of battering rain which yielded about 8 gallons in my water catching buckets and presumably filled the big water butt back up.
I decanted the 8 gallons into plastic gallon containers and it rained the following night yielding another 6 cans worth.
The runner beans are planted and one has some red flowers already.
Courgettes are all planted and showing their yellow flowers.
The peas are struggling but not dead.
Spinach is looking well for all the rain.
French beans are looking quite strong, I planted some from the greenhouse and sowed another packet straight into the garden.
The direct sowing was done with the victorian seeder which did quite well where it didnt skip seeds too much.
They were both rusty and the lower in the picture was absolutely seized.
The card helps to keep the seeds towards the front part of the hopper where the chute is.
I made the spring for this one from an old Bicycle caliper brake spring we had lying around.
The row coverer is a bit of old foot pump with a strip of the stuff you join flooring together with at a door.
The handle is from a very old knackered Tripod.
This is slightly better for accuracy of rows than the other more original seeder.
The graduated chart goes from Beans at the top, to carrots at the bottom.
I will get a picture of the actual seed chute etc tomorrow ,my battery gave out just when I was about to photograph it today.
I have sown some brassicas out direct also as the greenhouse plants nearly all died.
I was left with only 3 brussels sprouts and one broccoli of the earlier pot sowings.
I sowed pak choi and radish using a newer seeder (Danish) which was not bad but did seem to be oddly marked for spacing so I managed to sow about 8" of radish then an 8" gap then another 8" which I then had to thin out substantially once they showed.
I think I will write my own instructions for it once I get used to it more.
The direct sowing of brassicas was done with the less original Victorian seeder
Wednesday, 23 May 2012
Sunshine and seeds and slug proofing
Well it has been a very nice day!
So sunny that I had to rig up some temporary shading in the greenhouse.
It is an umbrella without the skeleton.
The Beans are all planted out in the garden.
Some are runners or Pole Beans.
I let the seeder sow a few rows of french beans.
It wasnt perfect but then it is 130 years old.
Today I planted out the Cucumber,Courgette(Zuccini) and pumpkins.
Then about 16 Pea plants.
I sowed some Peas too with the other seeder which I thought wasnt quite as good.
Surprising really as it was the one with more original parts.
My slug repellant is Aloe Vera ,watered down a bit in a spray bottle.
The greenhouse is starting to look a bit less crowded but there is a bit more watering .
Spuds got another earthing up today.
They get one about twice a week at the moment.
The veg plot is starting to look more like its old self again.
Wednesday, 9 May 2012
Amateur metal working
I have been making bits for my wheel hoe.
Well , one bit really.
It is an oscillating hoe.
A lot of the new wheel hoes have them and I thought I would try my hand at a home made one.
Mine is made from a strip of iron bar we had, and 11 inches of a 24" steel rule(OH's late father had them everywhere so we had a surplus).
The steel rule is the blade.
So far I have had it working but the oscillating bit needs some fiddling to get it right.
I needed to bend the steel and used some pieces of wood and my own weight and a club hammer.
Once bent into two Stirrup shapes,one bolts to the other and all are bolted to the wheel hoe.
The oscillating bit is a little piece of metal that has a small space for the blade to wobble within so that it swings ever so slightly as you push back and forth but not enough to let it erode the metal or the bolts.
The deliberate agrarian has a few pictures of his own that he makes to go with his 'planet Whizz bang hoe' so that was a handy guide.
Also I have been playing with a couple of Absolutely ancient seeders.
They are from the late 19th Century I think as the only info I could find on the WWW was for one made around 1879 and is very similar with the same makers name.
They came as a pair because they were incomplete but there was enough there to make one whole machine with a bit of fiddling.
It seemed a shame to just discard the other parts so I have been fabricating my own replacement bits using the Dremel, a hack saw, a drill and several old bits of metal from things we had lying around broken.
I have one working and needing a new handle and paint the other is working,needs a better handle and paint.
The one with no handle has part of an old wooden one still stuck in the metal handle bracket so I have some work to do to get that out,the screws holding it in are stuck fast.
The other has a thin handle I connected to it rather weedily and although it does work as a handle, it isn't robust enough and will need replacing.
This morning I dug my bean trenches (finally).
The weather is still one long round of drizzle or mizzle or just thin rain.
Grey clouds and cool wind.
The beans are becoming taller and are going to need to go outside in about a week, so the trenches are dug and comfrey is laid in them thickly to act as a fertilizer.
The spuds are just starting to show their leaves.
The row with the shop bought seed potatoes anyway.
The others will show up in their own good time. They were not as far along in the chitting when they went in so will be later to surface too.
Everything in the garden is nestling in a cloddy mess.
The strawberries have loads of flowers and the rhubarb is doing well.
They don't mind the rain although it does encourage the slugs as well which means keeping an eye on the strawberries as they will hollow them out if they can get to them.
Thursday, 26 April 2012
Finally Pics of my Jalo Gardener Bracket !
We have had rain for days and days.
Today I actually got out into the garden with my phone which has a camera on it.
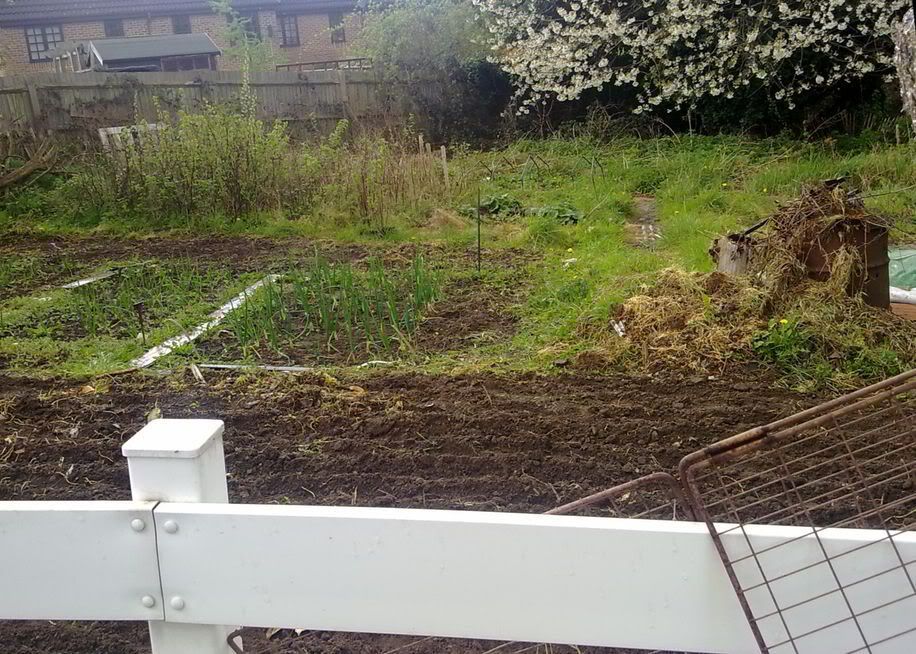
I got some digging done with the Trusty Azada.
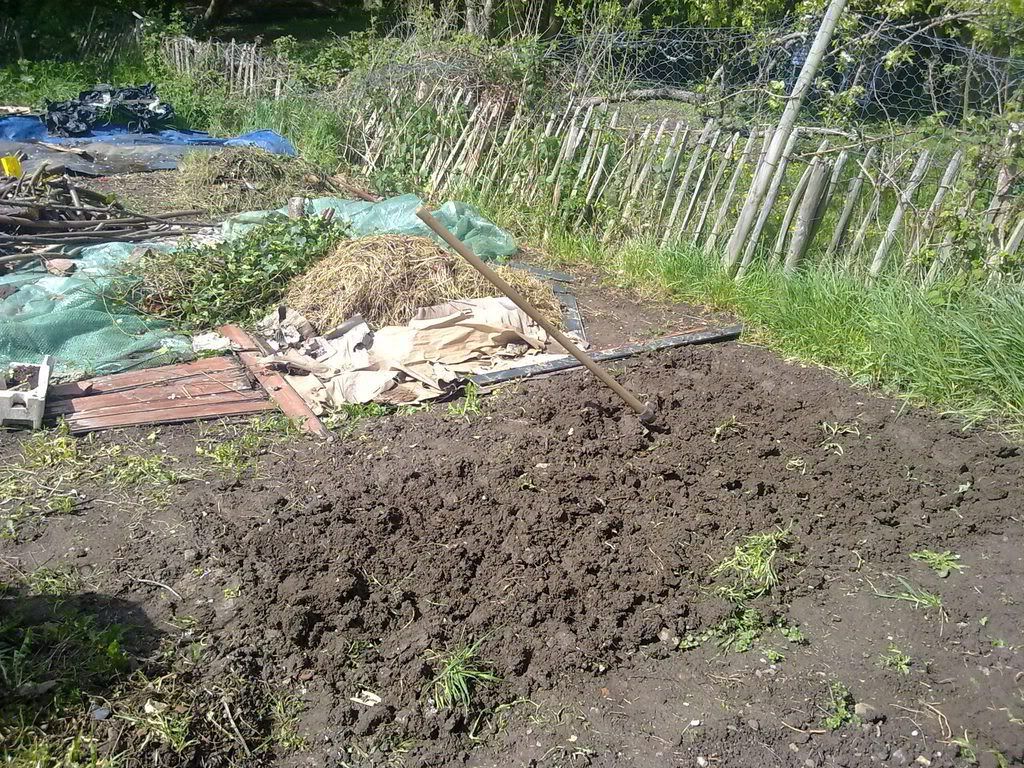
The junk lying on the ground is all the stuff I have got covering the 'cleared but not working on at the moment' earth.
The blue thing at the far end,is the old car cover thing that was left here when we moved in 24 years ago.
It is thick plastic and quite heavy.
From there on,is all weeds and trees.
It was quite cloddy but I pesevered.
This more ploughed bit is hopefully going to be for the beans.
The bit of wooden fence was chucked into the garden by a neighbour in the houses along the bottom behind a 6ft fence. I have it for walking across the mud at the moment.
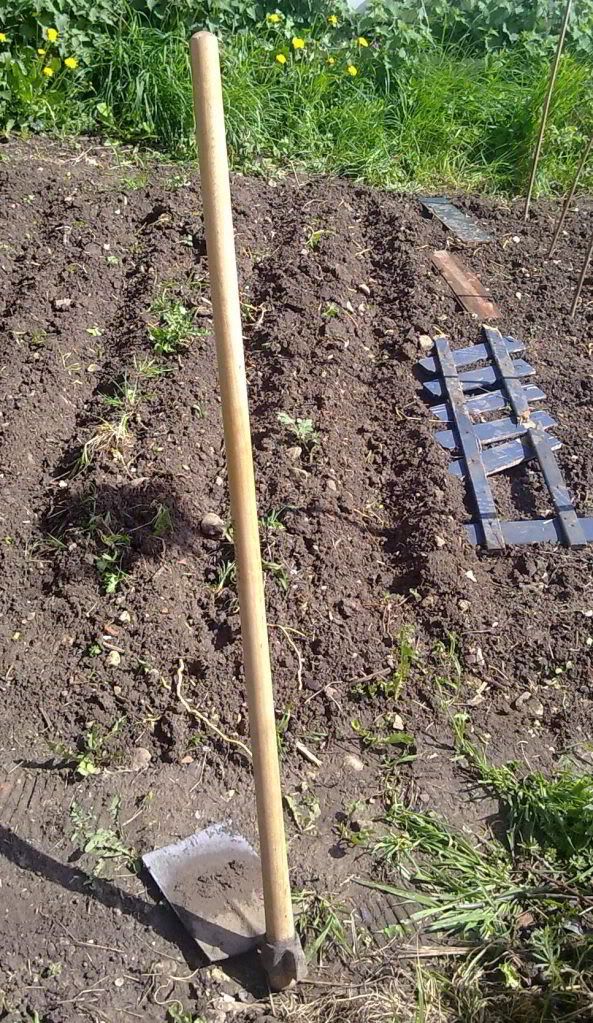
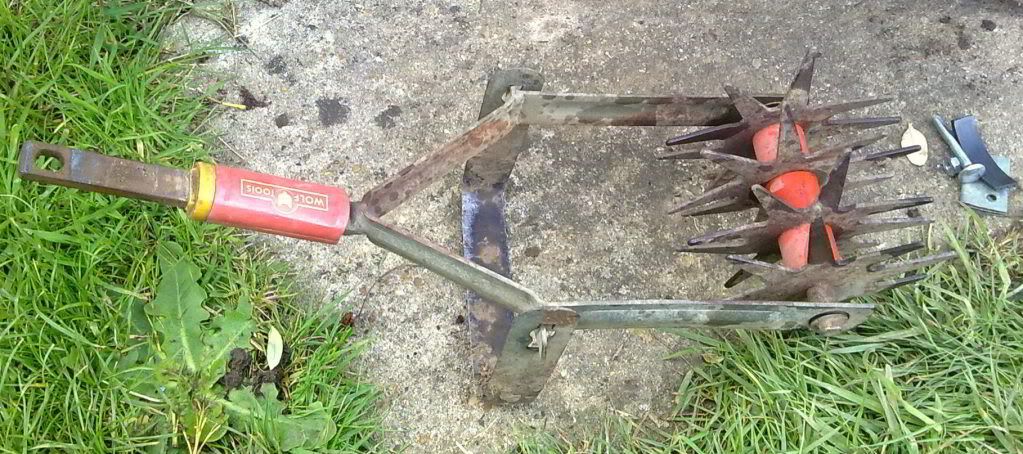
Next I got the new Toy (A Jalo with cultivating teeth/Tines YAY) and gave that a try.
I was looking on Ebay for the tines for my other Jalo and found this .
Often you will see either Jalo or planet junior hoes with various tools very cheaply because they are collection only but I was lucky with this one as the owner had offered delivery too.
The last one I saw with many tools, went for about £90 and there is one up there today with about 5 days to go, that will sell very well despite being collection only I think, as it has every tool that Jalo produced apart from a seeder.
This one was £27 . I thought that was a bargain because 3 Tines from America (only place selling them new) is about £53. I paid £ 15 for the delivery and it came in 2 days so that was very good value and far cheaper than driving half way across the country to collect it.
The Tines are in very good nick with only light surface rusting which was easily removed with a light rub down and the handle of the machine could really do with a rub down and paint just to smarten it up.

The teeth work well and go quite deeply after the Azada has broken the ground.
I have 5 teeth or tines for it but have only got 3 on it in the 2nd picture as it is so muddy today.
Then I changed the teeth to the plough fitting (which I bought on Ebay a few weeks back for £12 delivered) and ploughed for a while.
I forgot to get a picture of the plough .
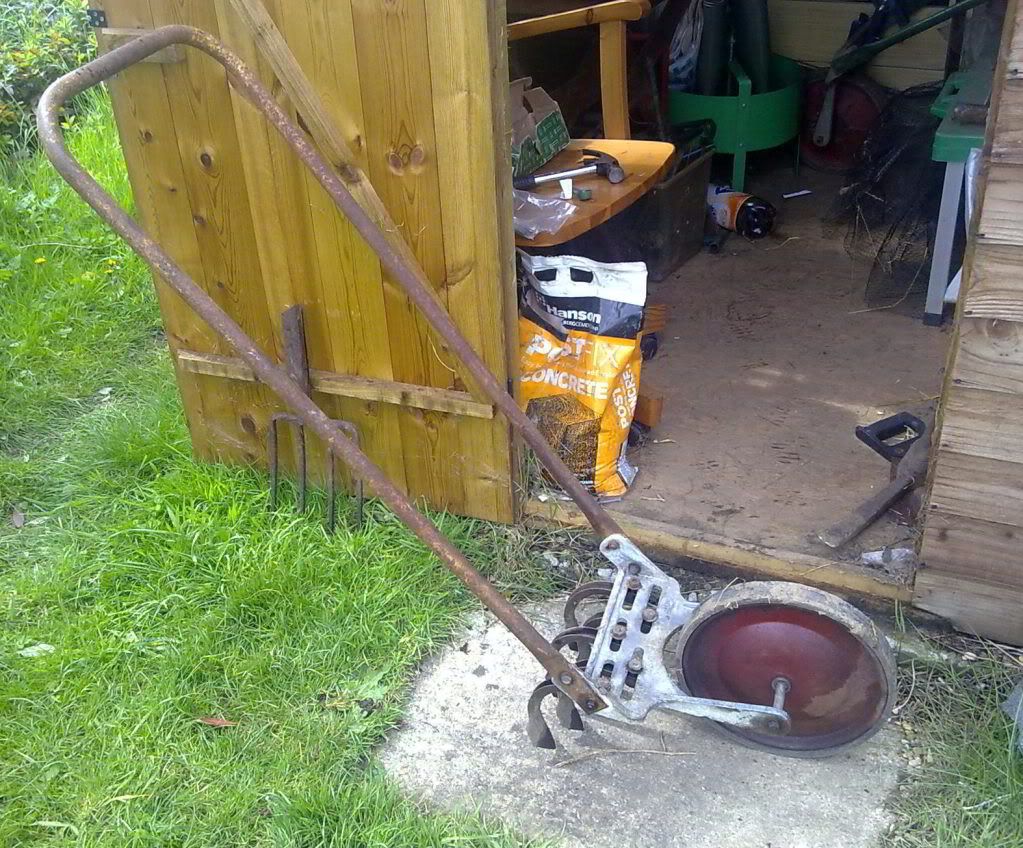
Last of all, I got the other Jalo out of the shed to take some pictures of the new bracket that I made last week.
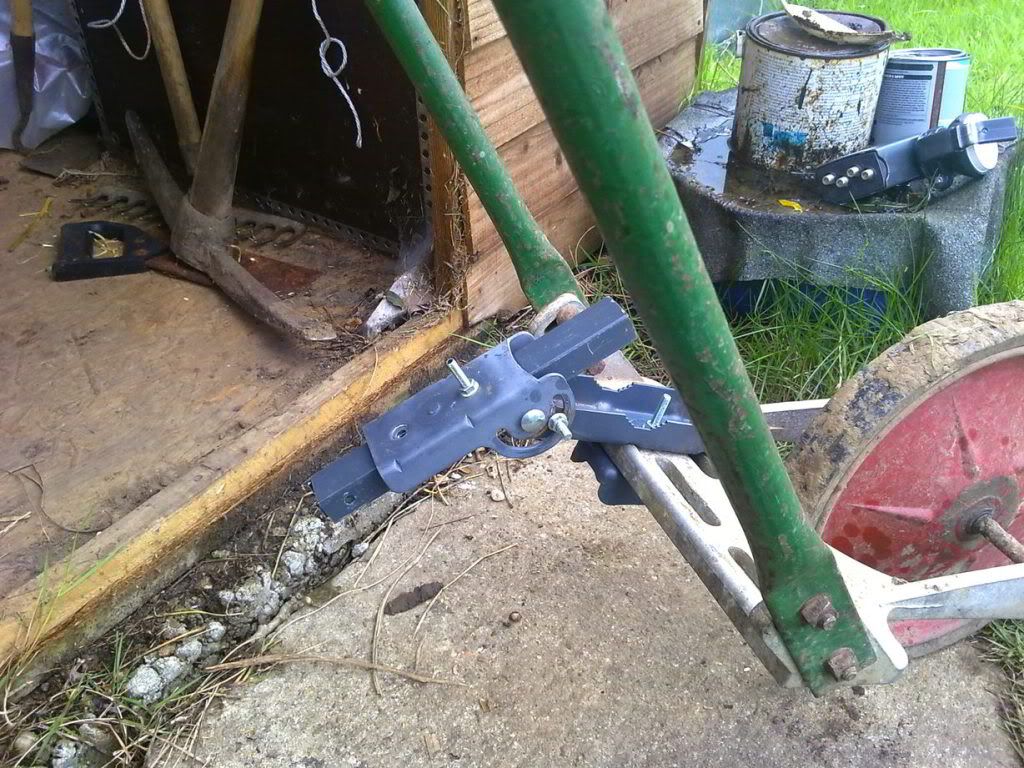
My Bracket made from a cut down Satellite dish bracket .
I made this because you don't often see single tools for sale with delivery for the Jalo.
You have to look for weeks and weeks before one turns up and then of
course you must bid for it.
That can push the price up too far.
We have a few wolf multichange tools that we bought before we moved here and I have one or two newer ones ,they are the type that all fit into one handle ,so the bracket has furnished me with all the other tools I might want for my wheel hoe.
The wolf tool handles slide into the rectangular tubing,with a small slither of rubber just to make it a firm fit.
Then just do up the bolt.
It works perfectly and I can fit the wolf tools into the bracket and have it set to any angle along one axis ,so that it can be for deep or shallow use.
That is massively improved on my first bracket which was just a tab to hold the wolf handle steady against the frame.
The first attempt worked perfectly too but I had no depth control except that of lowering or raising the handle angle by holding it differently which was awkward.
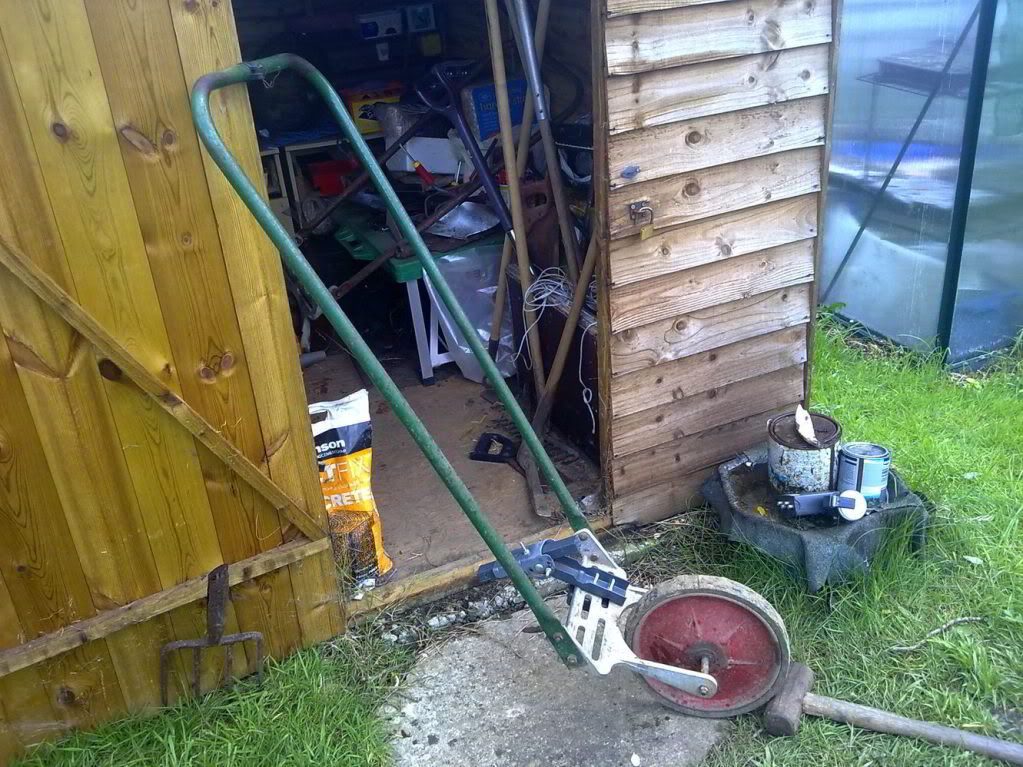
The Bracket simply unbolts from the Jalo if I want to use it without.
No drilling or cutting on the trusty old tool.
These machines really help with a vegetable garden ,especially if you are tackling the work single handed.. They take a lot of the slog out of the work.
I think it is because you are pushing and pulling like you do with a mower but you are not having to also take the weight of the tool. Even the wolf tools are easier because you have two hands to do the propelling rather than one.
We have had rain for days and days.
Today I actually got out into the garden with my phone which has a camera on it.
I got some digging done with the Trusty Azada.

The junk lying on the ground is all the stuff I have got covering the 'cleared but not working on at the moment' earth.
The blue thing at the far end,is the old car cover thing that was left here when we moved in 24 years ago.
It is thick plastic and quite heavy.
From there on,is all weeds and trees.

It was quite cloddy but I pesevered.
This more ploughed bit is hopefully going to be for the beans.
The bit of wooden fence was chucked into the garden by a neighbour in the houses along the bottom behind a 6ft fence. I have it for walking across the mud at the moment.
Next I got the new Toy (A Jalo with cultivating teeth/Tines YAY) and gave that a try.
I was looking on Ebay for the tines for my other Jalo and found this .
Often you will see either Jalo or planet junior hoes with various tools very cheaply because they are collection only but I was lucky with this one as the owner had offered delivery too.
The last one I saw with many tools, went for about £90 and there is one up there today with about 5 days to go, that will sell very well despite being collection only I think, as it has every tool that Jalo produced apart from a seeder.
This one was £27 . I thought that was a bargain because 3 Tines from America (only place selling them new) is about £53. I paid £ 15 for the delivery and it came in 2 days so that was very good value and far cheaper than driving half way across the country to collect it.
The Tines are in very good nick with only light surface rusting which was easily removed with a light rub down and the handle of the machine could really do with a rub down and paint just to smarten it up.


The teeth work well and go quite deeply after the Azada has broken the ground.
I have 5 teeth or tines for it but have only got 3 on it in the 2nd picture as it is so muddy today.
Then I changed the teeth to the plough fitting (which I bought on Ebay a few weeks back for £12 delivered) and ploughed for a while.
I forgot to get a picture of the plough .
Last of all, I got the other Jalo out of the shed to take some pictures of the new bracket that I made last week.


My Bracket made from a cut down Satellite dish bracket .
I made this because you don't often see single tools for sale with delivery for the Jalo.
You have to look for weeks and weeks before one turns up and then of
course you must bid for it.
That can push the price up too far.
We have a few wolf multichange tools that we bought before we moved here and I have one or two newer ones ,they are the type that all fit into one handle ,so the bracket has furnished me with all the other tools I might want for my wheel hoe.
The wolf tool handles slide into the rectangular tubing,with a small slither of rubber just to make it a firm fit.
Then just do up the bolt.
It works perfectly and I can fit the wolf tools into the bracket and have it set to any angle along one axis ,so that it can be for deep or shallow use.
That is massively improved on my first bracket which was just a tab to hold the wolf handle steady against the frame.
The first attempt worked perfectly too but I had no depth control except that of lowering or raising the handle angle by holding it differently which was awkward.
The Bracket simply unbolts from the Jalo if I want to use it without.
No drilling or cutting on the trusty old tool.


These machines really help with a vegetable garden ,especially if you are tackling the work single handed.. They take a lot of the slog out of the work.
I think it is because you are pushing and pulling like you do with a mower but you are not having to also take the weight of the tool. Even the wolf tools are easier because you have two hands to do the propelling rather than one.
Wednesday, 11 April 2012
Pictures of the garden
I thought it was about time I got the camera into commission once again.
So here it what I have been up to these hols.
 Cherry Tomatoes just coming up,they are a variety called cherry Bell that I haven't tried before.

So here it what I have been up to these hols.
The cold frame with a make-shift cover
5 rows of potatoes and beyond that you can see the onion beds.
Cherry blossom on the right.
The fruit bed is beyond the onion beds.
The bent over green frames are the tops of the old plastic greenhouses,now used as supports for netting to keep the birds and foxes off the strawberries.
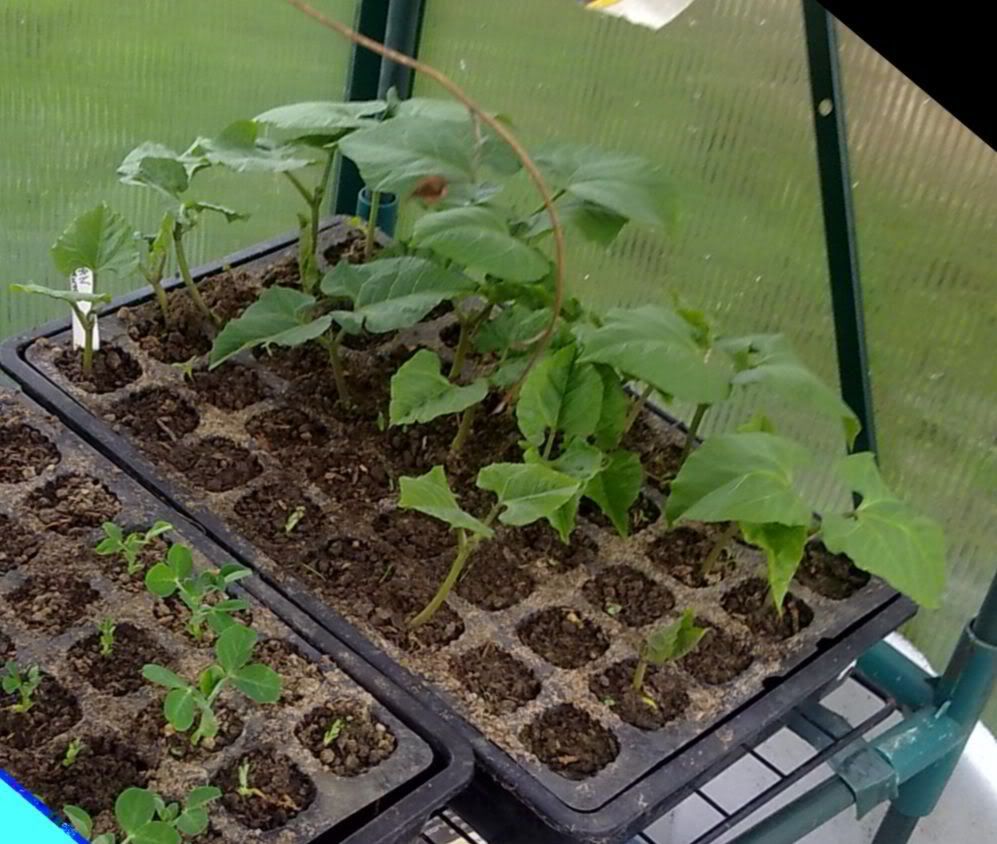
Runner Beans ,Scarlet Emperor (I potted these on yesterday)
Rainwater in Gallon cans ready for watering.
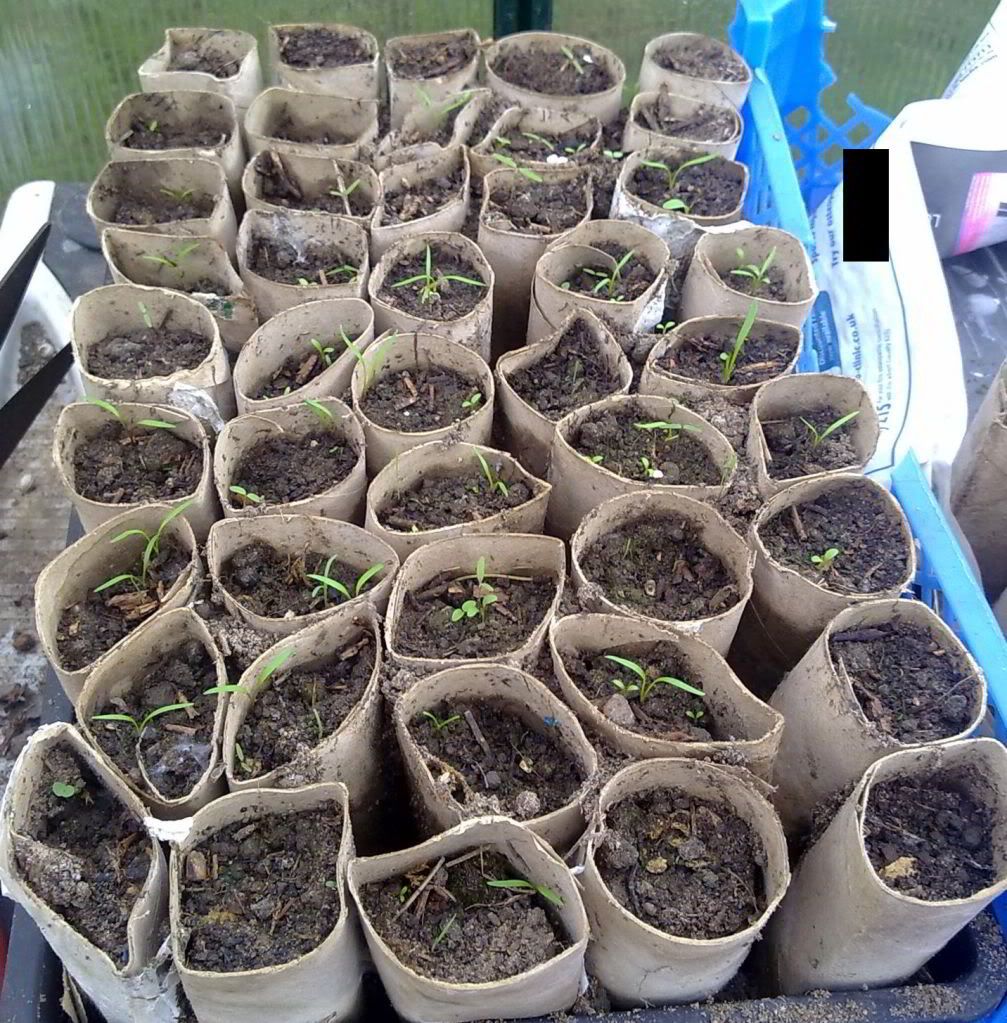
Carrots in loo roll tubes. I have a second lot started and will add to them every 2 or 3 weeks.
I didn't get a picture of the inside of the cold frame which is filled to bursting, as it was raining and I didn't want to get the camera any wetter.
Yesterday after lunch,the postie brought my new toy which is a plough tool for my wheel Hoe.
I found it on Ebay and managed rather jammily to get it for £12.50 delivered.
I have been using the hoe a bit more this year so I spent quite a long time a few days ago,making a bracket for it using the Dremel and some Aluminium from an old Apple Mac case,fashioning an adaptor for Wolfe tools so they could be used on the hoe.
I managed to make one that would fit all the ends and so all that is needed is to slot the end in and do up a bolt. This works well with the cultivator end and the tiller with the oscilating hoe on and has made it much quicker working the soil. The flatter hoe is unfortunately not angled and so wont really be useful as a wheel hoe attachment .
The whole potato bed was cultivated in about 1 hour from bare earth and then ploughed to take the spuds in about 15 minutes.
Then it was a slower job to bend over and plant all the potatoes in the furroughs.
Last of all ,a swoosh along each furrough and the spuds were covered again.
It was raining by the time the spuds were laying in the earth and so they got a free watering to get them going.
I'll try to get some pictures up of the wheel hoe and its new tools once it is a dry day again. Today is overcast and it has rained and I haven't cleaned off the mud caked plough tool due to the rain becoming rather heavy and me being in it .
Friday, 30 March 2012
Keeping a heavy purse
This month I withdrew £120 at the beginning so that I could use it to challenge myself to a grocery challenge.
I shop every weekend and then that must last us the week.
Last weekend was the last shop for this week as the Saturday and Sunday of this week will be used to buy next weeks food etc.
I still have £43 in there!
I think that is the best I have managed since before I worked from home.
Back then I could spend £10 to £15 some weeks and have all we needed for a week.
That was when I grew nearly all the veg we needed.
I did find myself thinking of spending a couple of times.
I went to the cinema on Monday but took a sandwich,banana,chocolate and a drink with me. The ticket was from a survey site so the day out cost me nothing at all and I was chuffed that it had not, despite thinking of myself as being a seasoned skinflint.
Lidl had tillers last weekend and I was sorely tempted to buy one but I was there on foot and knew I couldn't carry it all the way home.
At home afterwards, I read about them and realised that tillers are not rotovators, they are more like my push hoe. They break up already dug earth.
The Azada and the push hoe can do that and they don't use electricity.
I also realised I would have had to buy a cable long enough to reach all the way to the bottom of the garden which might have cost anywhere from £30-£50 so not so cheap after all.
Not spending money
It is sunny and bright here today.
The garden beckoned so I ""trudged"" skipped down there
My Azada was super useful.The garden beckoned so I "
I have still got quite a bit of ground to clear but with my trusty digging tool ,it is not back breaking work.
I think I have cleared enough space foe the potatoes, the beans ,and hopefully Brassicas.
The onions are looking healthy and not too weedy still.
Lizard lodgers
In the compost bin,there were at least 6 slow worms snoozing away.
One of the big grey males was minus his tail.
They can break off their tail if they are threatened and it will grow back again.
You can see where they have grown them back because they are always a bit smaller in girth.
The females are browner and the babies are copper coloured usually with a little brown line down each side.
Slow worms are lizards not snakes and you can tell them by their little dark eyes and blinky eyelids.
Snakes don't have eyelids.
That bin is the slowest to decompose and I often find inhabitants of the reptilian sort.
They are harmless and beautiful.
If I water that bin well,they will find another place I expect but I like them so they can share the bin with me and I will just wait till they are not around before I take any compost from it.
Potting on
I find potting on rather tedious.
You must do it when your seedlings become too large for the original vessel.
Having sown many of mine in those little sectioned trays this spring, I had plenty to pot up.
I chose Brussels-sprouts and Broccoli.
There were about 30 of each which seems loads but they wont all make it .
The slugs around here practice speed eating.
The newly potted up plants are in the cold frame and will be joined by Kale in a few days.
Seedlings are beginning to pop up.
Leeks are poking out above the black mud in their pot.
Cabbages are beginning to appear.
The carrots I planted in loo rolls are not out yet and I have a second lesser sowing to follow them.
Tomatoes are not showing and neither are spring onions or lettuce.
There is no hurry.
I was pleased to see some pea seedlings and some of the pole beans have made a start.
I love spring and growing things.
Sunday, 13 November 2011
oops where did the week go?
Yesterday I went to the poundland shop in town and bought;
I cut two slots in it near the hinge side and fitted the dremel in.
It fits with the chuck poking out one end and the wire poking out the other.
All the blades fit in the other sections.
Today I played with the scroll saw.
I have had it years. We bought it when I wanted some Montessori puzzles and accessories for teaching the kids.
We couldn't afford to buy them so we bought the saw and wood and made them.
Last week I found that I can get new blades for it cheaply on ebay.
Now I just need a new spring for the blade assembly and it will be good as new.
Christmas
I am in my usual Xmas making mood.
I spent a day of last week making a new waterproof pouch for OH's phone.
He has one but it is quite battered so he will have another.
I used a found clear plastic umbrella which had a little tear in it, for the plastic,it has to be transparent as he uses his phone to record video of his commute via motorbike so it must let the lens work.
It must be waterproof although not immersible, so it doesn't wet the phone if it rains..
This was cut to size, folded and folded and melted with the iron using foil to stop it sticking.
Then The edge was finished all around with the umbrella edging which was purple but it is very dark once you fold it and melt it so not particularly a bad colour to use.
I will get a pic of it up tomorrow,cant at the mo as OH is downstairs and might catch me in mid camera wielding mode.
He has 2 cinema tickets stashed away for his birthday too.They need using by the last day of the year but I cant see that being a problem. People buy tickets for events as presents and they are often in 3 or 4 hour windows of one day,whilst these will be able to be used for any one of 9 days or any two if he decides to go alone to two different films.
- a pack of chocolate to share with my son
- A sectioned box for small tools or screws
- A bottle of concentrated star drops.
I cut two slots in it near the hinge side and fitted the dremel in.
It fits with the chuck poking out one end and the wire poking out the other.
All the blades fit in the other sections.
Today I played with the scroll saw.
I have had it years. We bought it when I wanted some Montessori puzzles and accessories for teaching the kids.
We couldn't afford to buy them so we bought the saw and wood and made them.
Last week I found that I can get new blades for it cheaply on ebay.
Now I just need a new spring for the blade assembly and it will be good as new.
Christmas
I am in my usual Xmas making mood.
I spent a day of last week making a new waterproof pouch for OH's phone.
He has one but it is quite battered so he will have another.
I used a found clear plastic umbrella which had a little tear in it, for the plastic,it has to be transparent as he uses his phone to record video of his commute via motorbike so it must let the lens work.
It must be waterproof although not immersible, so it doesn't wet the phone if it rains..
This was cut to size, folded and folded and melted with the iron using foil to stop it sticking.
Then The edge was finished all around with the umbrella edging which was purple but it is very dark once you fold it and melt it so not particularly a bad colour to use.
I will get a pic of it up tomorrow,cant at the mo as OH is downstairs and might catch me in mid camera wielding mode.
He has 2 cinema tickets stashed away for his birthday too.They need using by the last day of the year but I cant see that being a problem. People buy tickets for events as presents and they are often in 3 or 4 hour windows of one day,whilst these will be able to be used for any one of 9 days or any two if he decides to go alone to two different films.
Sunday, 16 October 2011
Tools rediscovered
I went on a little shopping expedition Saturday morning.
First stop was Hobby Craft.
It is a big warehouse type outlet selling everything hobby based.
I bought a helping hand tool for when I am soldering or gluing or painting,all of which I do every now and again.
A little pot of clear ceramic paint for adding a protective layer on top of my hand painted mugs.
A packet of Bits for the Dremel rotary tool that I salvaged a couple of days back.
Hobby craft is not always the cheapest option but often has everything you need.
Todays purchase was £3 off the paint so worked out about the same as buying the whole lot on-line would have,plus I didn't need to pay postage.
There are 60 pieces in the Bits set which was £13.99 as opposed to a 100 piece Dremel set in Wickes who wanted £29 !! When you consider that a lot of 'pieces' are actually things like a circle of sandpaper,a shaft to hold a blade, a soft circle to polish things, I think there was just as much useful stuff in the Hobbycraft set.
I wont buy lots more bits for it, some will be fabricated to incorporate the shafts that came in this set.
No idea what the thing that was stuck in the Dremel originally was, it appears to be a shaft with a nearly smooth end so possibly it was worn almost smooth over time. As it wasn't something you could remake , just having some new empty shafts is enormously advantageous.
This set will now be used to fabricate new blades for my mini bandsaw which I have rescued from certain death out of our Narnian book cupboard.
Pull ups today 40 in all,longest continuous 10
One legged Pistol squats 72=3x24 each leg
Wednesday, 12 October 2011
Keeping up with the exercise
Yesterday I did about 44 pull ups.
I do them whenever I am downstairs and remember to do it.
I think I did one 10 and the rest lesser amounts.
I also did 3 X 8 pistol squats each leg.
I go quite carefully with them because it is easy to hurt your knees if you don't get the angle of your knee right.
It can be quite stretching for the Achilles tendons too.
I can do them without holding something for balance now.
We ran yesterday evening.
2.89 miles.
It took 30 minutes which seemed quite slow but was only a little bit slower than usual once I uploaded the Garmin results.
I have been leaving my Garmin at home a few times just so it doesn't get too obsessive.
I think there was a wind blowing against us on the way back but I didn't notice it behind us on the way out.
Mending and making do
We inherited a Dremmel from a relative. Just the main unit ,no attachments.
It is one of those rotary tools where you fit little saw blades and drills and grinding ends into a shaft and then you can work on small projects.
We already have a cheap rotary tool but this is much heavier duty.
After much pulling and puffing,I managed to get the tool that was jammed in it, out.
It needed pliers and a lot of twisting and tugging.
The chuck is perfectly okay though so I will have a go at making some tools for it sometime this week.
Instructables has some interesting home made bits for them so I must do some research.
Subscribe to:
Posts (Atom)